
 Deutsch
 Русский
 Español
 Français
No products in the cart.

Lash Extension Guides, Eyelash Knowledge & Education
Lash Taping Techniques: A Practical Guide for Lash Artists
11
Jul
Jul
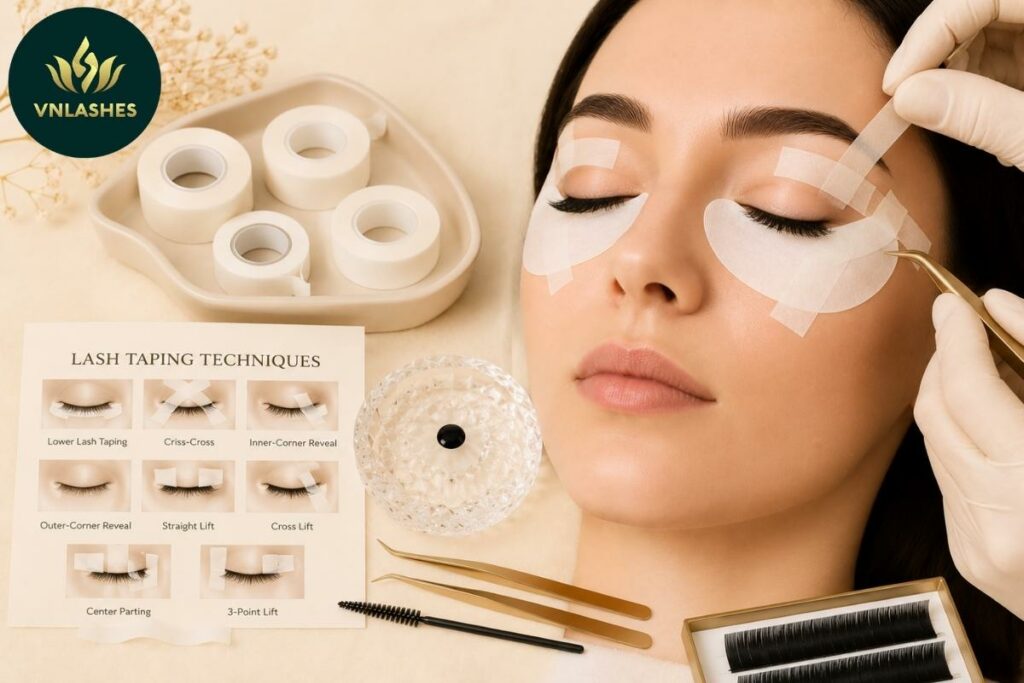
Lash taping techniques help lash artists secure bottom lashes, improve visibility and access difficult areas during eyelash extension application. When used correctly, these methods can support cleaner isolation, more precise lash placement and a smoother working process.
As a lash extension manufacturer and wholesale supplier, we understand that professional results depend on both product quality and proper application techniques.
What Are Lash Taping Techniques?
Lash taping techniques are different methods of positioning adhesive tape around the eye area during an eyelash extension service.
Professional lash taping may help to:
- Secure bottom lashes
- Stabilize under-eye patches
- Expose inner and outer corners
- Lift the lash line gently
- Separate dense lash layers
- Improve access to natural lash roots
Tape should be applied carefully and must not touch the waterline or prevent the eyelids from closing completely.
Why Are Lash Taping Techniques Important?
Correct lash taping techniques can make the application process more controlled, efficient and comfortable.
Improve Access to the Lash Line
Hooded eyelids, deep-set eyes and downward-growing natural lashes can make lash roots difficult to see. Gentle tape placement can expose the working area without excessive pulling.
Support Better Lash Isolation
Natural lashes often grow in different directions and layers. Lash taping techniques can separate these sections, making individual hairs easier to isolate and reducing the risk of stickies.
Secure Bottom Lashes
Fine lower lashes may escape from under gel pads during treatment. Under-eye tape provides extra support and keeps them separated from the upper lash line.
Stabilize Eye Patches
Eye patches may shift because of moisture, facial movement or the shape of the under-eye area. Small tape strips can help keep them securely positioned.
Common Types of Lash Tape
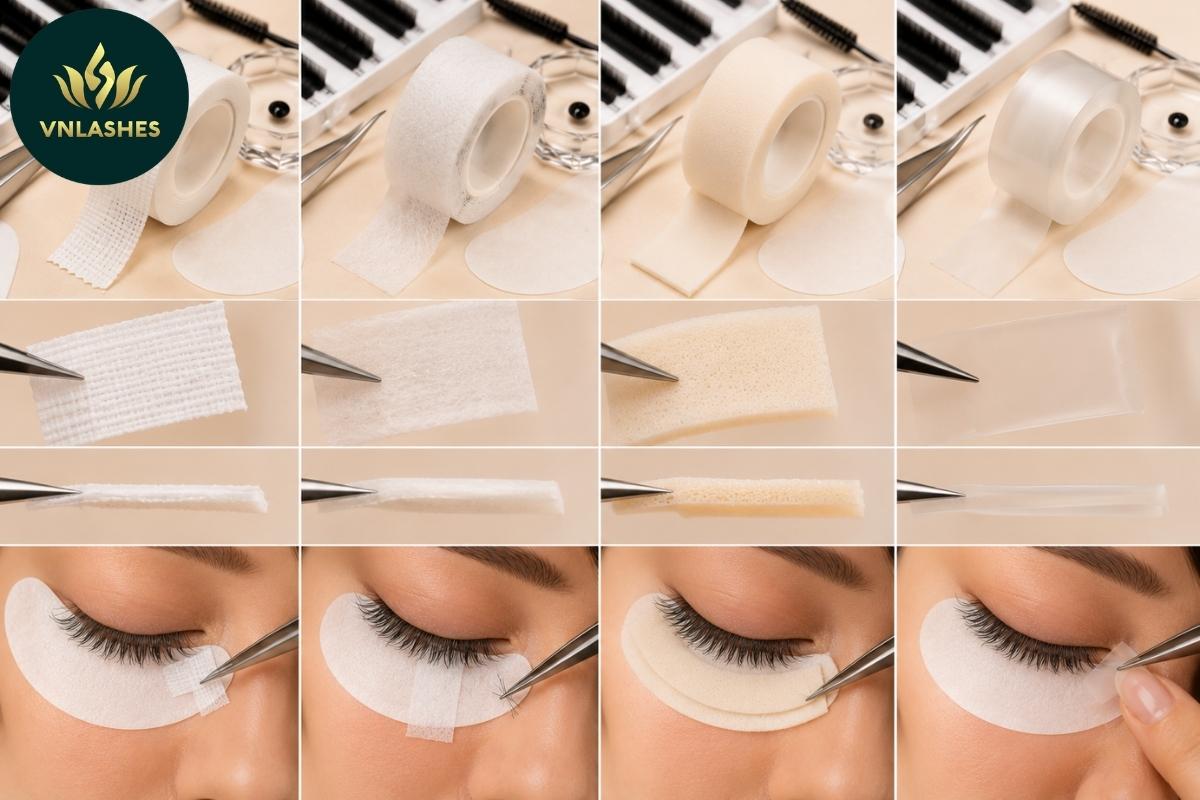
Different tape materials provide different levels of adhesion, softness and flexibility. The most suitable option depends on the client’s eye shape, skin condition and service requirements.
Micropore Tape
Micropore tape is a lightweight paper-based material commonly used with professional lash taping techniques.
Its main benefits include:
- Breathable construction
- Moderate adhesive strength
- Easy cutting and adjustment
- Flexible placement
- Gentle removal when applied correctly
It is often used to support eye patches and cover short bottom lashes.
Non-Woven Surgical Tape
Non-woven surgical tape usually provides stronger adhesion than standard paper tape.
It may be useful for:
- Stabilizing moving eye pads
- Securing difficult lower lashes
- Longer lash appointments
- Clients with frequent facial movement
Because adhesive strength varies, lash artists should check client comfort before prolonged use.
Foam Tape
Foam tape has a thicker, cushioned structure and can adapt to different under-eye contours.
It is commonly selected for:
- Deep-set eyes
- Prominent cheekbones
- Curved lower lash lines
- Clients who find gel patches uncomfortable
The thickness should be checked to ensure that it does not press against the eye area.
Sensitive-Skin or Silicone Tape
Low-adhesion and silicone-based tape may be easier to reposition and remove. These options may suit delicate skin, although individual sensitivity can vary.
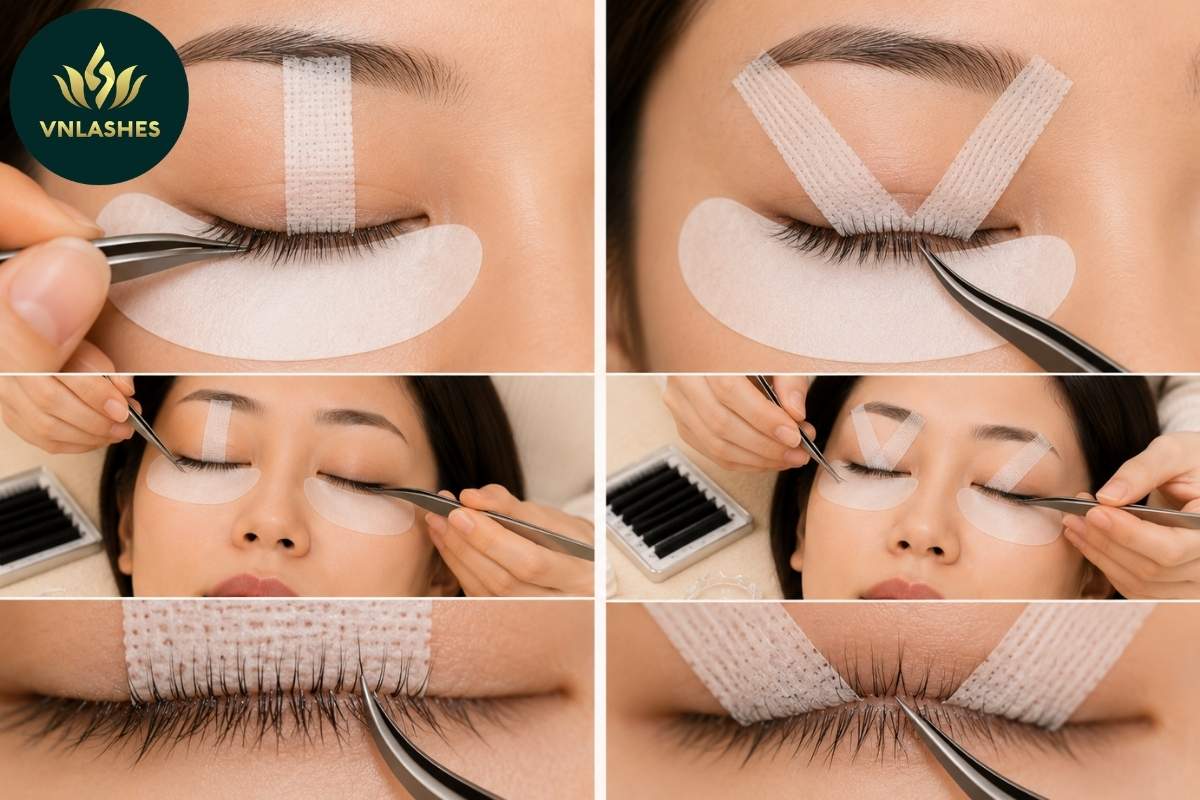
7 Essential Lash Taping Techniques
The correct method depends on eye shape, natural lash direction, eyelid movement and the area that needs greater visibility.
1. Lower Lash Taping Technique
The lower lash method is one of the most widely used lash taping techniques.
An under-eye patch is positioned first, followed by small tape strips to cover any exposed bottom lashes. The inner and outer corners should be checked carefully because short hairs often remain visible in these areas.
This technique is suitable for curved lower lash lines, fine bottom lashes and moving eye patches.
2. Criss-Cross Lash Taping Technique
The criss-cross method uses two diagonal strips placed over the under-eye patch.
One strip supports the inner area, while the second secures the outer section. This placement helps reduce patch movement and prevents small lashes from escaping.
It is especially useful when standard eye pads do not remain stable throughout the service.
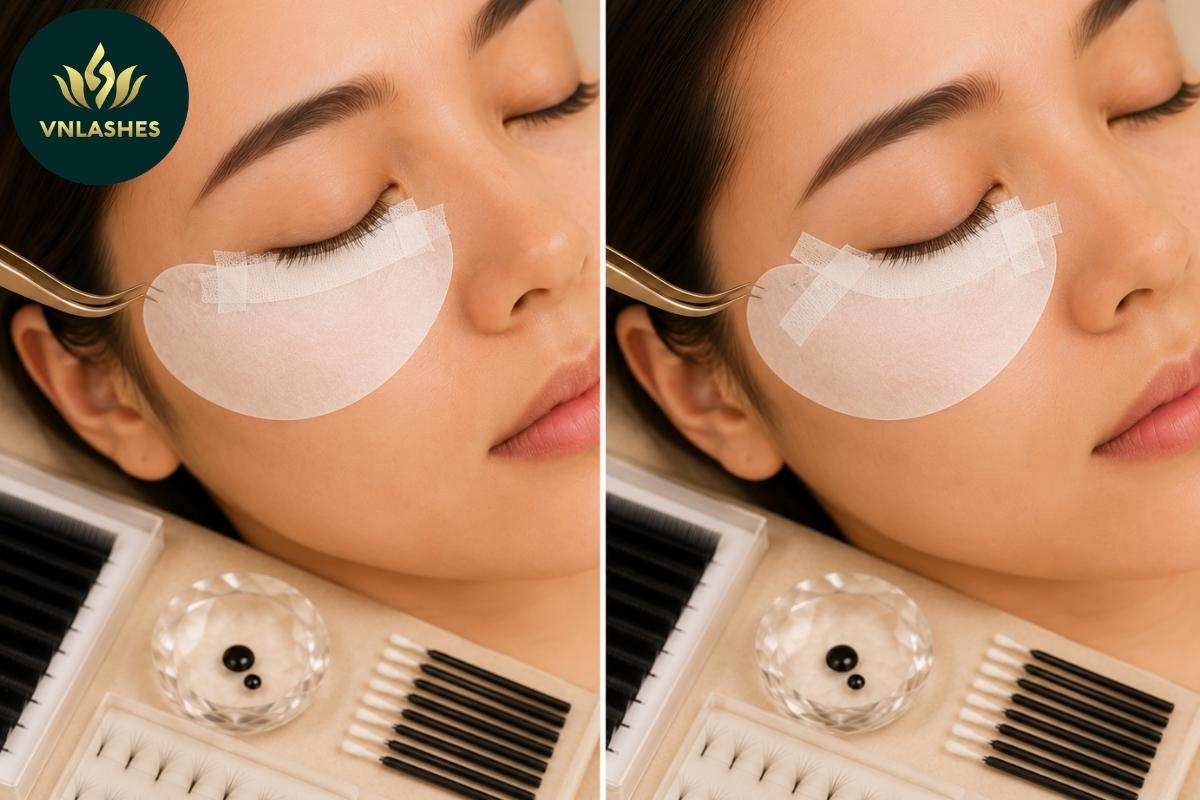
3. Inner-Corner Reveal Technique
Inner lashes are often short, fine and difficult to access.
A small tape strip is placed on the upper eyelid and moved gently toward the outer side. This exposes the inner lash line and improves access for isolation and extension placement.
Only light tension should be applied.
4. Outer-Corner Reveal Technique
This lash taping method improves access to natural lashes near the outer edge of the eye.
Tape is positioned on the upper eyelid and guided slightly inward or upward, depending on the client’s anatomy. It can be useful for dense outer sections, drooping corners and cat-eye lash maps.
The eyelid must remain fully closed throughout the procedure.
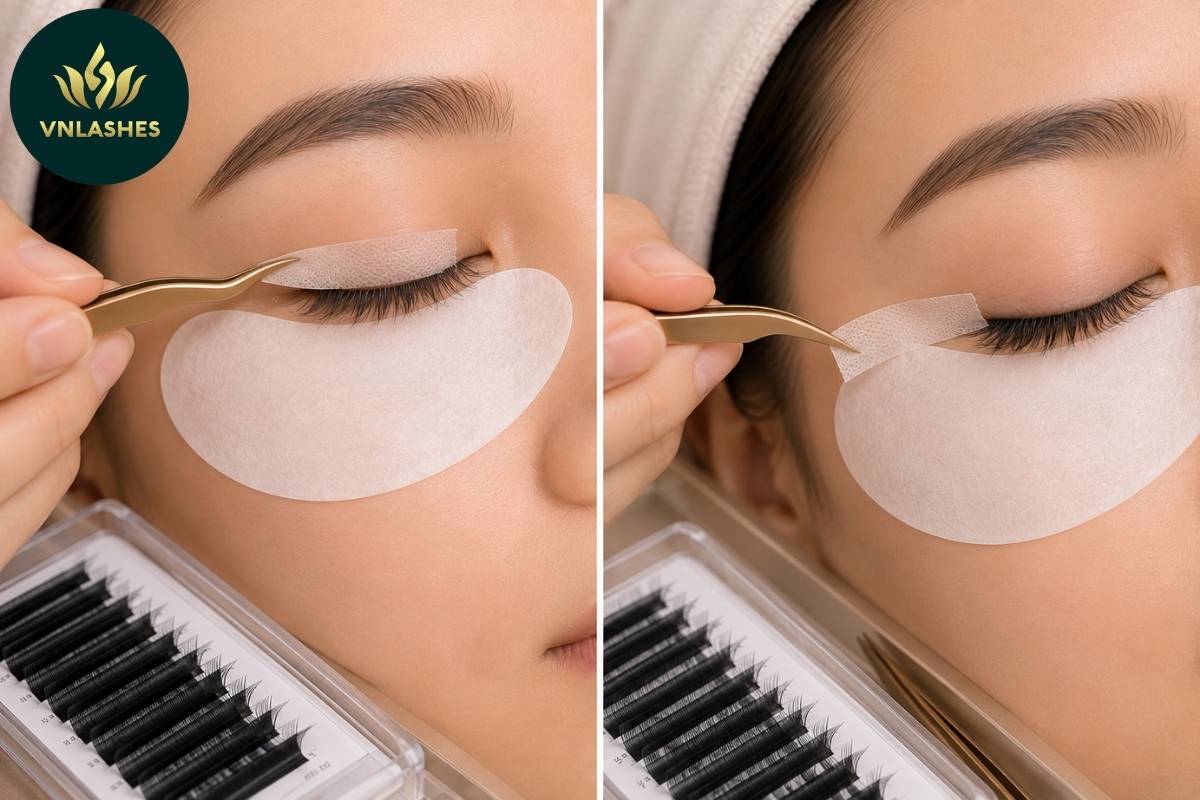
5. Straight Lift Lash Taping Technique
The straight lift method raises the lash line vertically.
One strip may be placed in the center of the eyelid, or two smaller pieces can be positioned near the inner and outer sections. The tape is lifted gently to expose the lash bases.
This is one of the most practical lash taping techniques for hooded eyes, mature eyelids and downward-facing lashes.
6. Cross Lift Technique
The cross lift method uses diagonal tape strips on the upper eyelid.
Each strip creates controlled lift in a different direction, making several sections of the lash line easier to reach. This technique may help when eyelid folds or uneven lash growth reduce visibility.
The placement can be adjusted as the lash artist moves between sections.
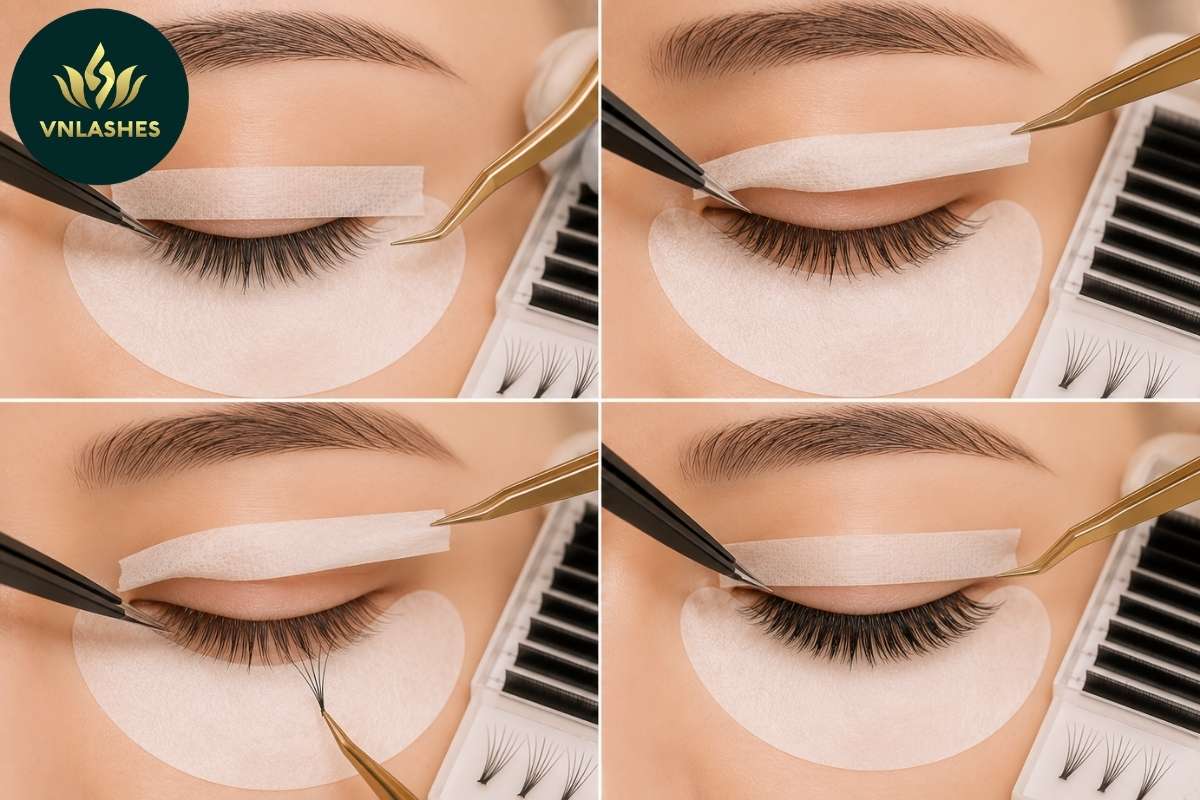
7. Lash Layer Separation Technique
Dense natural lash lines often contain multiple growth layers.
A selected section is lifted carefully with low-adhesion tape, revealing the lashes underneath. The lower layer can then be isolated and extended before the upper section is released.
Among advanced lash taping techniques, layer separation is especially useful for volume and mega-volume sets.
How to Choose the Right Lash Taping Technique
There is no single method suitable for every client. Lash artists should select lash taping techniques according to eye anatomy, lash direction and skin condition.
Evaluate the Eye Shape
Hooded, almond, round, deep-set and mature eyes may require different tape positions and lifting directions.
Check Natural Lash Direction
Upward-growing lashes may need minimal adjustment, while downward-facing hairs may benefit from gentle lifting.
Consider Skin Condition
Delicate or reactive skin may require softer, low-adhesion materials. Any history of sensitivity should be discussed before application.
Observe Eyelid Movement
Frequent eyelid fluttering may require more stable patch placement. However, tape must never force the eye open.
Safety Tips for Lash Taping Techniques
Safe lash taping techniques should support precision without creating unnecessary pressure around the eyes.
Lash artists should:
- Keep tape away from the waterline
- Use light and controlled tension
- Confirm that the eyes remain fully closed
- Cut tape with clean tools
- Never reuse previously applied strips
- Remove tape slowly and gently
- Check for discomfort during the service
- Replace wet, loose or contaminated tape
Tape should support the application process rather than pull the skin or natural lashes excessively.
Common Lash Taping Mistakes
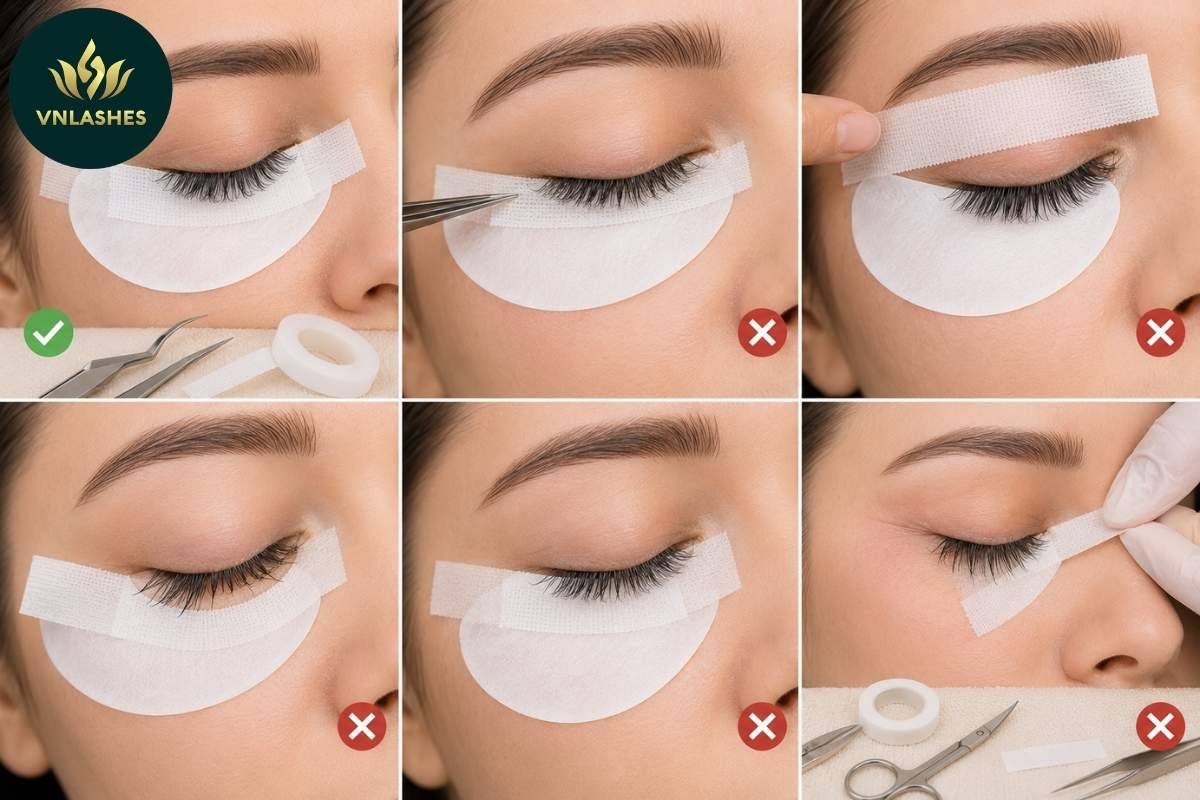
Using Tape With Excessive Adhesion
Very strong adhesive may pull the skin or natural lashes during removal. Tape strength should match the treatment area and client condition.
Pulling the Eyelid Too Tightly
Excessive tension may cause discomfort or prevent complete eyelid closure. Effective lash taping techniques require only minimal lifting.
Placing Tape Too Close to the Waterline
Tape positioned too close to the eye may cause irritation, watering or discomfort.
Missing Fine Bottom Lashes
Small corner lashes may attach to the upper extensions if they are not fully secured. The lash line should be checked from several angles.
Using the Same Method for Every Client
Eye shape, skin condition and lash direction differ between clients. Lash taping techniques should always be adapted to the individual treatment.
Lash Tape Considerations for Wholesale Buyers
Lash brands, distributors, academies and salon chains should evaluate tape based on material consistency and practical salon performance.
Important product factors include:
- Adhesive consistency
- Tape thickness and width
- Material softness
- Flexibility
- Ease of cutting
- Residue after removal
- Packaging quality
- Storage stability
- Comfort during professional use
Offering several tape options, including micropore, foam and low-adhesion materials, helps wholesale buyers serve different lash artist preferences.
Why Consistent Lash Tape Quality Matters
As a lash extension manufacturer and wholesale supplier, we know that inconsistent accessories can affect professional lash taping techniques.
Tape with weak adhesion may shift during application, while an overly strong product may be difficult to adjust or remove. Reliable lash tape should provide consistent thickness, clean edges, stable holding strength and practical packaging.
This product consistency is particularly important for training academies, salon chains, distributors and beauty brands purchasing in larger quantities.
Frequently Asked Questions About Lash Taping Techniques
What Is the Best Tape for Lash Extensions?
Micropore tape is widely used because it is lightweight, flexible and easy to cut. Foam tape may be preferred for deep-set eyes or curved under-eye areas.
Can Tape Replace Gel Eye Patches?
Some lash artists use foam tape or layered tape instead of gel pads. The chosen material must fully secure the bottom lashes without causing pressure or discomfort.
Which Lash Taping Technique Is Best for Inner Corners?
The inner-corner reveal method gently moves the upper eyelid outward, making short inner lashes easier to see and isolate.
Can Lash Taping Techniques Separate Lash Layers?
Yes. Low-adhesion tape can temporarily lift one section, allowing the lash artist to work on the lash layer underneath.
Why Does Lash Tape Move During Application?
Tape may move because of oily skin, moisture, facial expressions, unsuitable adhesive strength or incorrect placement. Cleaning and drying the area before application may improve stability.
Conclusion
Mastering different lash taping techniques helps lash artists secure lower lashes, improve isolation and access difficult sections of the lash line more efficiently.
Effective lash taping depends on selecting the correct material, using gentle tension and adapting each method to the client’s eye shape and natural lash growth. For lash brands and wholesale buyers, consistent tape quality is equally important for supporting reliable professional performance.


Bài viết liên quan
Zero Time Promade Fan Lashes – Wholesale Manufacturer & OEM Services
For lash salons and professional eyelash brands, application efficiency and consistent quality are important factors...
Oct
Magic Fan And Zero Time Promade Fan – A Faster, Time-Saving Lash Extension Solution
In the professional lash extension industry, application speed and product consistency are important factors for...
Oct
Custom Magic Fans Manufacturing and OEM Services: Production Process
When sourcing Magic Fans in bulk, buyers need more than just an attractive lash tray....
Aug
Lash Extension Removal: Common Mistakes and Safe Techniques
Lash extension removal is an important part of professional lash care. When extensions are removed...
Jul
Lash Foam Cleansers: A Practical Guide for Lash Professionals
Lash foam cleansers are essential products for cleaning natural lashes, eyelids and eyelash extensions. They...
Jul
Lash Adhesive Remover: A Must-Have Product for Professional Lash Businesses
In the lash industry, a beautiful lash set is not only about application. Safe, clean,...
Jul